
If you’ve ever mixed music for other people, you’re bound to run into musicians recording vocals on pre-mastered instrumentals. What do you do at this point? Well, certainly there are things you can do to fit an unmixed vocal to a mastered instrumental.
Keep in mind though, that this should only be your last resort. While you can’t do much with this sort of inevitable work, let’s look into what you CAN do!
Contents
Should I Record Vocals Over an Already Mastered Track?
If you can avoid recording vocals over an already mastered track, you should avoid it. Although you can record vocals over an already mastered track, it will never sound professional. You need the full mix, with the stems, to be able to balance each element properly around the vocals.
Probably the biggest issue with adding vocals to a mastered track is that no matter what you do, your vocals will never sit exactly where they need to be. You can’t shape individual instruments and tracks around your vocal, which will cause your track to either be too loud or low in volume or your vocals to sound separate or too shrouded by the beat.
On top of that, you’ll have to master your track again, causing extra compression and quantisation distortion. If the final master has already been dithered, then dithering it again will further introduce artefacts and noise.
Do not record vocals over an already mastered instrumental, unless it’s your last option.
Can You Mix Vocals Professionally on A Mastered Instrumental?
You’ll never be able to achieve a professional vocal sound when mixing it on an already mastered instrumental. Unless you can shape your instruments around your vocal, other than a few outlier cases, your vocal will sound detached from the instrumental.
No matter how good you are at mixing, adding a vocal to a mastered instrumental will never sound as good as a well-balanced and spaced mix. While there are things you can do to get vocals working together with a mastered instrumental, you should never do this as anything but a last resort.
That being said, let’s look at what you can do if you’re ever in this unfortunate situation!
How Do You Mix Vocals on A Mastered Instrumental? (Step by Step Tutorial)
Here are the 4 steps you need to do, to mix vocals on an already mastered instrumental:
1. Optimise your listening space

With mixing and mastering, everything starts with your listening space and environment. If you’re mixing on headphones, this is less of an issue, but proper mixing on monitors needs an acoustically treated room to produce accurate and well-translating mixes.
If you can’t hear exactly what’s happening in your track, you probably won’t be making the right decisions when it comes to mixing or mastering.
If you’re using headphones, we suggest utilizing correction software such as SoundID or the Waves NX Virtual Mixing Room, to get the best results possible. For people using monitors, SoundID and Waves NX can also be helpful, but your listening space and room are key to a good mix and master!
Equipment Needed for Optimal Listening Space
To create an acoustically treated environment, you’ll need to purchase some equipment like acoustic pads, diffusers etc. Here’s a quick list of the thing you need to create a good listening environment for studio monitors.
- Acoustic foam – absorbs frequencies, preventing things like slapback echo, resonances and more. This gives a more natural, flat listening experience, which is great for mix decisions.
- Diffusers – disperses sound across the room evenly for a consistent listening experience. This prevents sound reflections from getting trapped in corners and amplifying each other.
- Bass traps – absorb bass, mid & high frequencies. Usually placed a few feet away from the wall, to absorb a low-end wave at it’s maximum velocity. Prevents standing waves, flutter echo, speaker interference & more.
2. Reduce the level of your mastered track
So before we get to Mixing our vocals and the track, it’s important to set your levels to give you room to work with. To make the vocal and instrumental fit together better, we’ll be re-mastering the track at the end, so for this, you’ll need to drop the level of your mastered instrumental.
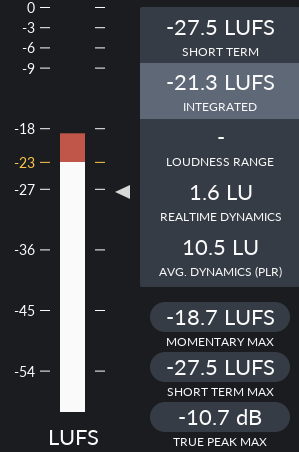
We usually drop the master level so that it peaks at around -10 dB to -6 dB, to give us headroom for the vocal to sit on top, as well as the mastering later on.
To check the levels of your tracks, you can either use your DAW’s faders, or a much more accurate level meter plugin such as:
3. Set the gain & level of your vocals
Next, set your vocal level according to your instrumental. We like to set the vocal to be slightly below where we would want it for the final levels, so that after compression, EQ and other processing, it will hit the db level we want.
If at any point your vocal is getting too loud, drop the level down a bit! This is a basic level before applying FX, so don’t worry too much about getting this exactly on point.
Just make sure your vocal is low enough so that it doesn’t overload your compressor plugin.
Setting the level is all about listening to your vocal with the master track and asking yourself a couple of key questions:
- Do I have enough headroom for compression, creative FX & mastering?
- Does the vocal sound too separate from the instrumental/is the instrumental too loud?
- Can I make out everything the vocalist is saying?
Keep asking those questions and alter until you’re happy with the sound.
3. Use dynamic processing, EQ & Saturation
Before we start fitting the vocal to our instrumental, we need to get our basic vocal mix out of the way to give us a better understanding of where it’s fitting in the mix!
Levelling & Compression
To make your vocal pop, you need to make sure your vocal levels are uniform. Depending on the vocalist’s position, or the dynamics of the arrangement, your vocal can sound all over the place in terms of loudness.

Some plug-ins can automate the gain on your vocal automatically, but usually, you’ll be doing this manually with gain automation.
(Try to use a gain knob plugin for automation instead of the mixer volume, in case you want to adjust the volume later, without affecting the automation.)
Once you have a more or less uniform loudness across your vocal, it’s time to add some compression.
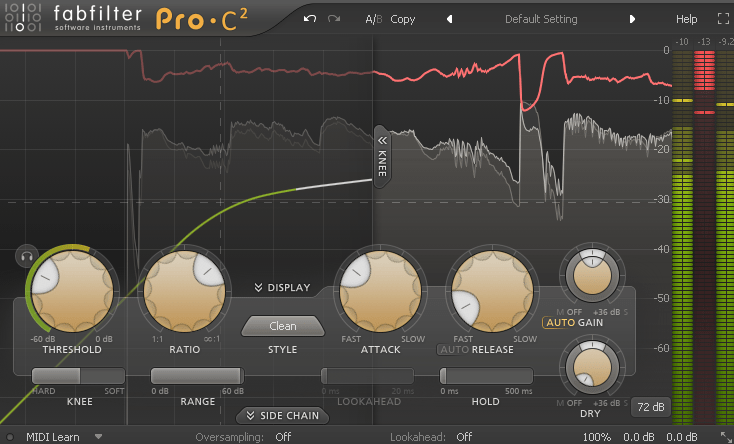
When adding a vocal to a mastered instrumental, we usually like to compress our vocal a bit further than usual. Set the threshold so you’re getting about 5dB to 7dB of Gain Reduction.
(you can use the meter on your compression plugin to see how much gain reduction is being applied)
Set your Ratio quite high, in this case, we’ll go for a ratio value between 4:1 and 8:1 to get a more aggressive compression. Set a medium attack and a fast release to add more edge to the vocal sound.
Compression and levelling will make sure that your vocal remains consistent over the length of the track.
EQ
What you’ll be doing with your EQ depends on your vocalist’s voice and tons of other factors. So, with EQ take everything here with a grain of salt and make sure you know your EQ plugin inside & out.
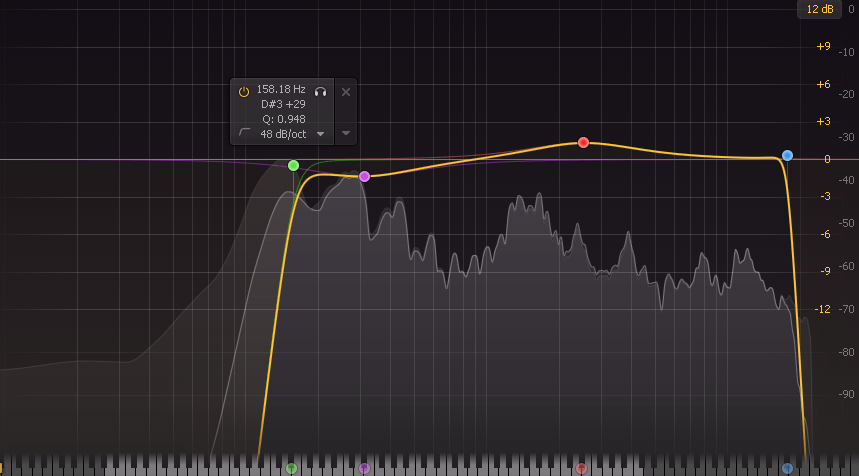
What we do here, may not work for your vocal, so just do what sounds best in the context of your track. In general, however, we’ll remove the bottom end from all vocals (usually up to 150-200 Hz). Make sure you use your ears in this process because a large low-end cut will remove a lot of body from your vocals.
Another universal thing we usually do is a low pass at around 18kHz, this will make the vocal sound much more controlled and consistent.
Try to use your EQ to make the vocal fit the tonal vibe of your instrumental as much as you can. Good EQ work can be the difference here, so make sure you spend some time figuring out what you should do.
A great way to get an idea of what you should be doing is using an AI EQ tool like Sonible’s Smart:EQ – it’s surprisingly accurate at getting a good starting point to build from, and, a lot of the time we don’t actually change the settings on it because it sounds great.
Saturation

Usually, we enjoy some good tube or tape saturation on our vocals. Adding some saturation can give your vocals a lot more energy and make them pop way better.
Saturation can be easy to overuse though, so make sure you’re constantly checking the before and after. You could feel like you’re making improvements while you’re just ruining the vocal mix.
Our favourite saturator is the FabFilter Saturn, which allows for multiband saturation. For vocals adding saturation in the mids can be extremely useful for both comprehension and energy.
Keep in mind that these are very basic mixing steps, so make sure you’re using your ears and doing the vocal justice!
4. Apply resonance suppression & creative FX

Dynamic Resonance Suppression
The term might sound scary, but Dynamic Resonance Suppression is probably THE thing that will make the difference when trying to fit a vocal to an already mastered instrumental.
What it is is a real-time frequency sidechain compressor. This is better than scooping frequencies out of your instrumental, to help the vocal fit, because it allows your vocal space without removing key resonances and frequencies that make your instrumental sound good.
If you try to carve out space using EQ in your instrumental, it will sound a lot worse than dynamic resonance suppression.
Tools like Oeksound Soothe or Wavesfactory Trackspacer are perfect for this. You can just set up your instrumental to react to the vocal, so now, every time your vocal is doing something, only those frequencies get ducked out of the way. Thus, giving your vocal space in the mix and making the entire thing more cohesive.
Reverb and Space

Another trick you can try out is placing the instrumental and vocal in the same reverb space. However, be warned that, this is just a trick, and if you rely on it too much, you can easily make your track sound blown out and horrible.
Having two different recordings feed into the same reverb can fool the listener into thinking they’re recorded in the same space at the same time. This can be a good way to make your vocal and instrumental feel like they fit together.
Drop your reverb of choice onto a return track and feed both your instrumental and vocal to it. Make sure you’re not overdoing it, but when used subtly, this can make the difference!
5. Finally, master your track
Mastering
Once you’re satisfied with how your vocal sits with the instrumental, you’ll have to master the track. This is where the headroom we left earlier will come and help us out. We won’t run you through how to master your music in this article though, because it’s a very lengthy topic. We have a way more in-depth mastering tutorial for you to check out!
Mastering your track at this point will inevitably reduce the quality of your instrumental, purely just because of added compression as well as quantisation distortion. This, sadly, is completely unavoidable when you’re mastering a previously mastered track.
That being said, keep your mastering subtle, and try not to add too much compression and saturation, or you’ll start feeling those digital compression artefacts!
Summary
Mixing vocals to a mastered instrumental like this will never get you professional-level results, so only do this as a last resort! When there’s nothing else you can do, you might find mixing vocals to a mastered instrumental inevitable, in which case, we hope we helped you figure out what to do!
If you enjoyed this article, make sure to check out some of our other awesome tutorials, lists and reviews!
Toms is a music producer & DJ, born and raised in Post Soviet Latvia. Currently based in Brighton, Toms has had over 6 years of experience with all things production and in that time, he’s done a tonne of cool stuff! He’s played multiple festivals, had experience in the field with mixing & mastering and even become a freelance journalist in the music industry.
Toms currently creates music under the alias Sovereign. Producing music that’s intimate and subtle, while full of edge and energy, the young producer combines the artistic sounds of Trip Hop artists like Massive Attack, with the energy and youthfulness of producers like Flume, Jamie XX and Yaeji. You can check his stuff on Soundcloud.


