
Master your understanding of compression settings:
Quick guides to compression settings for instruments:
Do you know that full, round, and groovy drum sound that you hear in professionally produced records? Well, you’re about to learn how to get it (or at least get close enough). Truth be told, mixing drums is complicated, and after almost 8 years of mixing hip-hop, EDM, and rock music, I’ve picked up a few tricks. In this article, I’m going to share them to help you get the best out of your groove. Let’s go!
Contents
Do You Need Compression on Drums? Things To Check Before Compression
Yes and no. You need compression if they’re excessively dynamic, snappy, or fluctuating. You don’t need compression if you’re working with mix-ready MIDI libraries, samples pre-processed loops, and triggered drum samples.
The first sample doesn’t need compression because everything sounds almost perfectly even and even flat, so compressing them would be beating a dead horse. You can tell by looking at it.

See how everything looks even and lacks dynamics like it was looped from a very short fragment of drum performance. This is very common with sample libraries.
Sample libraries, such as Kontakt, Slate Drums, Superior Drummer, and so on, usually bring pre-mixed samples and they’re already EQd and compressed so you can just throw them into your project.
The second sample needs compression because we can hear some inconsistencies in the performance, dynamics are a little jumpy, and transients are pretty excessive at times.
It’s clearly a live recording, which we know for sure because we can hear some bleed from the guitar amp, and it has some nuances in the dynamics that need to be controlled with compression.
For the sake of analysis, take a look at the waveform displayed in my DAW for this sample, and we can see that its dynamics need to be contained, as you can even see some peaks almost as high as 0dB.

Drums are the backbone of a song, so they need to sound dynamic, open, and exciting, for us to engage with the groove. Overcompressed drums sound dull, lazy, and dead, which basically kills the entire record before it was born.
Also, you need to make sure that things are on the right track, or else you’ll be creating new problems with the processing that you’ll still have to fix later on in the mix.
To avoid that from happening, check this before thinking about compression:
- Phase alignment
- Proper editing
- Gain structure
- Level balance
And ask yourself why do are you considering using compression and what problem are you looking to solve.
How To Set Up Your Compressor For Best Results
Please provide example audio throughout this piece to show how to compress drums.
1. Proper Gain Structure
This is key.
Before applying any sort of processing, you first need to properly set your gain structure. We recommend using a trim plugin or doing it directly to your audio clips depending on your DAW, and setting values that go from -9 dB to -16 dB.
Balancing your gain structure will give you a cleaner and more professional sound because most plugins are optimized to work their best at these values, which is especially important when you work with analog gear emulations.
This will also prevent you from getting your mixes tarnished by digital clipping, which will cause several problems with aliasing, create unwanted noises, and overall make your mix sound bad and amateur.
Hear the difference using the same settings on an SSL channel strip emulation:
No gain structure
After gain structure
2. Choosing The Right Compressor Style
Drums are almost exclusively transient information, so to compress drums you’ll need a compressor with very fast attack and release settings in order to tame down the spikes without destroying their dynamics.
That being said, you can’t go wrong with FET and VCA compressors, since they allow the fastest response during processing and lead to a more transparent and natural compression.
Listen to the difference between using an 1176 (FET), an API2500 (VCA), and an LA2A (optical).
FET compressor
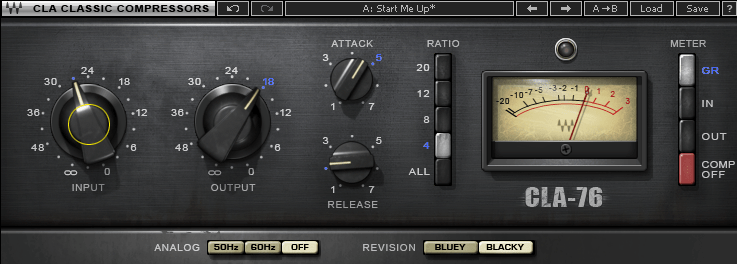
VCA compressor

Optical compressor

No compression
3. Threshold Settings
The threshold is to a compressor what the ears are to us, humans. If you set it too high the compressor won’t perceive any signal and the lower you take it, the more it can hear.
Usually, when you’re just dialling in your initial compression settings, you’ll try to keep it high in order to control the tallest peaks.
If you’re looking to even up the performance, you’ll probably want to set it to lower so that it picks up every transient, which is usually good to do on the drum bus

Another easy way to set this parameter is to take it all the way down until you can see and hear the compression and then back it up until it barely stops compressing.
Always keep in mind that the threshold is proportional to the ratio; if you’re using a high ratio, the threshold will have to be higher so that you don’t squash your signal, and lower ratios will require a lower threshold for the compressor to perceive the signal.
4. Setting your Attack & Release Times
Here are some general attack & release setting information for compressors:
- If you want to add punch, you need a slow attack and fast release because it lets the initial attack pass through and brings up the sustain.
- If you want to control peaks smoothly, you need a fast attack and release because the compressor will snap down the initial attack and get out before the next hit.
- If you want to bring up the sustain, you need a mid/fast attack and a slower release, because the compressor will engage right after the initial transient and hold for the duration of the decay, and sustain of the waveform.
- If you want tightness, you’ll need mid/fast attack and mid/slow release because the compressor will control the length of the sustain right after the initial transient.
5. Setting Your Ratio Controls
If the threshold is like our ears, the ratio is like an amplifier, which is why they complement each other.
When compressing drums, you usually don’t want to use ratio values above 4:1, depending on the instrument and situation. This is how I set up my ratios when compressing drums:
| Drum | Ratio | GR |
| Snare | 1.5-3:1 | 2-3dB |
| Kick | 2-3.5:1 | 2-3dB |
| Toms | 2-3:1 | 2dB |
| Overheads | 3-4:1 | 1-3dB |
| Room mics | 4:1 | 2-5dB |
| Bus | 2-4:1 | 1-3dB |
6. Managing Gain Reduction With Makeup Gain
Once you’re done setting up the parameters, you only need to match the output gain to the input compensating for the amount of reduction that’s being applied.
The right output gain isn’t necessarily the maximum amount of gain reduction applied, but that’s a great starting point and a good reference to dialling back the gain compensation. Do this manually even if the compressor has an automatic gain compensation feature.
By using compression we’re bringing the average levels closer to the peak level, which will create an audible difference in level and trick us into believing that one sounds better than the other just because it’s louder.
To avoid this and make informed decisions, just click on the bypass button to turn the compressor on and off, as you manually match the gain as closely as possible, to then compare the differences between the processed and unprocessed signal and check whether you did good or need any adjustments.
7. Hard Clipping, Soft Clipping and Limiting
I personally don’t use a lot of limiting on my drums, because to my ears it makes them feel a little flat and I don’t personally like the way it sounds. However, using limiters on your drums can help you make them more smashing and impactful.
Clippers, on the other hand, are really good to reduce the peak level of your by deforming the transients, allowing more headroom and increasing the loudness potential of the record.
Use these tools with care not going above 3dB of gain reduction, because otherwise, your drums will sound like the Opto compressor from above.
This is how we recommend using these:
- Limiting – Use on aggressive hip-hop, rock, or metal tracks, where you want smashing drums hitting very hard. These are best to use on slower parts, like a breakdown, because it’ll create more excitement and add a lot of energy to the track.
- Soft clipping – Use it when you want to reduce the peak level without introducing any distortion or artefacts.
- Hard clipping – Use it when you want to add punch and grit to your audio while reducing the peak level. Hard clipping is great for punchy hip-hop drums when you’re using pre-processed loops and aren’t getting the attack that you want for the track.
Using Advanced Drum Compression Techniques
Clipping into the limiter
Sometimes, you do need more level, but don’t want to clip the master bus or cause digital distortion, so you use limiting and clipping distortion to help you increase the perceived loudness of your track.
Before moving forward, it’s worth mentioning that you should always use limiters and clippers at the end of the chain to avoid unwanted artefacts and distortion. Here’s what you do:

In this case, I’m hitting -9, but the kick sample I received is incredibly dull, so I’ll have to exaggerate the attack without increasing the peak level because they’re already pretty tall.
First, insert the clipper and set the ceiling below -9dB to save some headroom for the next process.
Since I only want to affect the transients of the kick, I’ll be careful to set my parameters above the level of the snaps, so that they don’t get bothered, and will use extremely fast attack and release times to exclusively catch the transients. Also, I want to distort the signal to create harmonics for the attack, so I’m using hard clipping.
Then, I’ll add a limiter and take it down to around -10 to create even more distortion without reducing too much gain to avoid flattening the whole thing.
Then I adjust my release to work with the transient of my kick and not the sustain to preserve its tonality and compress no more than 3dB.

The idea is to bring the drums forward but create an attack for the kick because it was initially lacking high frequencies like it had a low-pass filter all the way down to 100Hz. The sample was excessively weak and wasn’t driving the song as it should.
Although the kick was so weak, it was still pretty spikey, so I needed to be very careful with how I wanted to manage the levels and make a big difference without adding much gain or touching the faders.
Now, it does seem like a lot of trouble to not move a fader up, so here’s a comparison between them both:
Fader up
Clipping+limiting
Fake Room
This is something I do a lot, particularly when the drums feel like they lack dimension or need to be more impactful.

What I do, is create an auxiliary track and send it to my drum bus. In the auxiliary track, I first add a linear phase EQ to remove unnecessary low frequencies, then a relatively long room reverb, typically something that emulates a chamber or a medium/large room, and finally a compressor.
Then, I’ll blend it in with the original signal to a point where I can barely hear the reverb, but makes the track more powerful with a bit of a 3D sort of feel.
Make sure to use an 1176 or FET compressor because the fast reaction will favour the sense of depth. Also, you want to make sure that you’re not compressing the transient but just the sustain. Otherwise, you’ll overdo the reverb and create the opposite effect.
Here’s a before and after example:
Before
After
NYC-style compression
NYC-style compression is a form of parallel compression that uses the same idea of mixing a signal with a heavily compressed version of itself, but with the addition of an EQ boosting 60hz and 10KHz. Here’s how:
First, send the drums to an auxiliary track or duplicate them. I’ll use the auxiliary because it’s simpler when I have several drum tracks going into a general bus.
Now, I like to use a Neve33609 emulation to compress the parallel track because, to my ears, it sounds a lot punchier and bigger.


I use the same settings as Chris Lord Alge for parallel compression, which are fixed attack, 100ms recovery, and 2:1 ratio. The threshold and makeup gain depend on your gain structure, so set accordingly.
Then for the boost, I like to use a Pultec EQP1A emulation with the bandwidth all the way down to “broad” and the attenuation selector set at 20.
Hear the before and after of this technique and see how using it exclusively on the drums affects the entire mix and instantly makes it sound bigger.
Before
After
FAQ
How Should A Drum Processing Chain Look?
It’ll always depend on the situation, but generally, EQ, compression, maybe some saturation, and reverb is how a processing chain looks in almost every single case. Sometimes you’ll need to add more processing, like upward compression, limiting, or de-essing, but usually, that combination in that specific order will do.
EQ goes first to balance the frequencies, then you compress the signal to control dynamics, and then add saturation to create excitement and punch. Finally, you add or send to-room reverb to create depth.
How Do I Get Punch on My Drums?
The easiest way to get a punch on your drums is by using parallel compression on the kick and snare. You can also add punch by compressing the overheads harder and gating the snare or, if you haven’t, by aligning phase.
If you’re working with live drum recordings, phase alignment is most likely what’s causing the lack of punch in your drums. If you’re mixing sampled drums, phase is often out of the question, so compression and/or distortion will usually work great.
How Do I Know How Much Is Too Much Compression?
When the drums sound flat and lifeless, bouncy, and sometimes distorted, it’s fair to say it’s too much compression. You can also know that you have too much compression because the drums will completely lose their punch, and they’ll start to sound muddy because of the lower frequencies of the kick coming upfront.
To give an example of how too much compression sounds like on drums, listen to these uncompressed drums and the difference between the same track compressed effectively and overcompressed:
Effectively compressed
Overcompressed
Uncompressed
What Is The Best Compression Setting For Drums?
It depends on the drums, the genre, the mood, and the context, but some general guidelines are keeping the ratio around 4:1 or below, using faster release times with intermediate attack, and reducing no more than 4dB of gain.
Typically, these settings will also depend on the drum element you’re compressing. For instance, you wouldn’t compress a snare drum like you would your overheads or your drum bus because they’re very different things and need a different treatment, so there’s not a one-for-all compression formula.
Javier is a mixing and mastering engineer who specializes in Rock and Hip Hop, and writes and produces his own music. He is additionally a TV, Film, and advertising audio editor who has been working freelance for 7 years. He loves sound design and is an avid expert in his field, having written hundreds of articles for other publications online about music production-related topics. To put it simply – Javier knows his stuff.


