
Mixing sub bass can be difficult to master. It can sound good in your headphones, but when you play it in speakers, your phone or the car – it just sounds muddy and lost.
In this post I’m gonna share with you 5 juicy tips to improve your sub bass mixing. I use these on almost every production.
Contents
1. Compression Is Your Friend
Compression is man’s new best friend when it comes to getting a thick, deep, low end in your tracks. If you don’t know what compression is, or how to use it – be sure to check out our what is compression in music guide.
But let’s go through some compression guidelines that will help. I need to stress that these are guidelines. There are no cookie cutter solutions to getting your sub to sound amazing – you need to use your ears & listen to what sounds good.
Guides can help you get further to your goal, but don’t take them as immovable rules.
Compression
Compression will reduce the gain of your signal, by squeezing the high amplitude & low amplitude peaks of your audio together. This will reduce the dynamic range of your audio & can make things sound thicker.
With sub bass, compression is a great tool make your sub bass ring more consistently & have more impact. You can completely smash sub bass most of the time, because it doesn’t need dynamic range.
Do you really want a sub bass that goes quiet and then loud? It’s not an instrument you classically want to have dynamics.
When compressing sub bass, I tend to follow a few guidelines:
- Do I really need compression here? – if you don’t have a goal in mind for your compression, you’re better off not compressing.
- Gain reduction of around 3-5db – you can go higher if you want less dynamic range. I can go anywhere between 5-10db gain reduction here, depending on the situation.
- Ratio start of 4:1 – this is a good starting place for your ratio settings. Change accordingly to what you want. Lower is less compression, higher is more compression.
- Medium attack of around 50ms start – the compression is often quite heavy on sub bass, you want a slower attack to make it sound smoother. If you have an 808 this would be similar – you want the transient to ring through, then the compression to thicken up the following audio.
- Release on auto – more often than not the auto setting will make a better choice than you will. If you have a more frequent playing sub, you’ll want a quick release. If you have a long, drawn out sub, you’ll need a slower release.
- Makeup gain – whatever you reduce, you need to put back into the signal.
- A/B listening – turn your compressor on and off & listen. You’re not listening to loudness – you’re listening for a change in thickness & body.
All of these settings will need to be changed depending on your situation, but they are a great starting point for thickening up a simple, sine wave sub.
Another useful thing to do here is, to group your Kick & Sub together and apply glue compression. This will congeal them, and make them sound like they are one sound, rather than disparate elements.
Sidechain
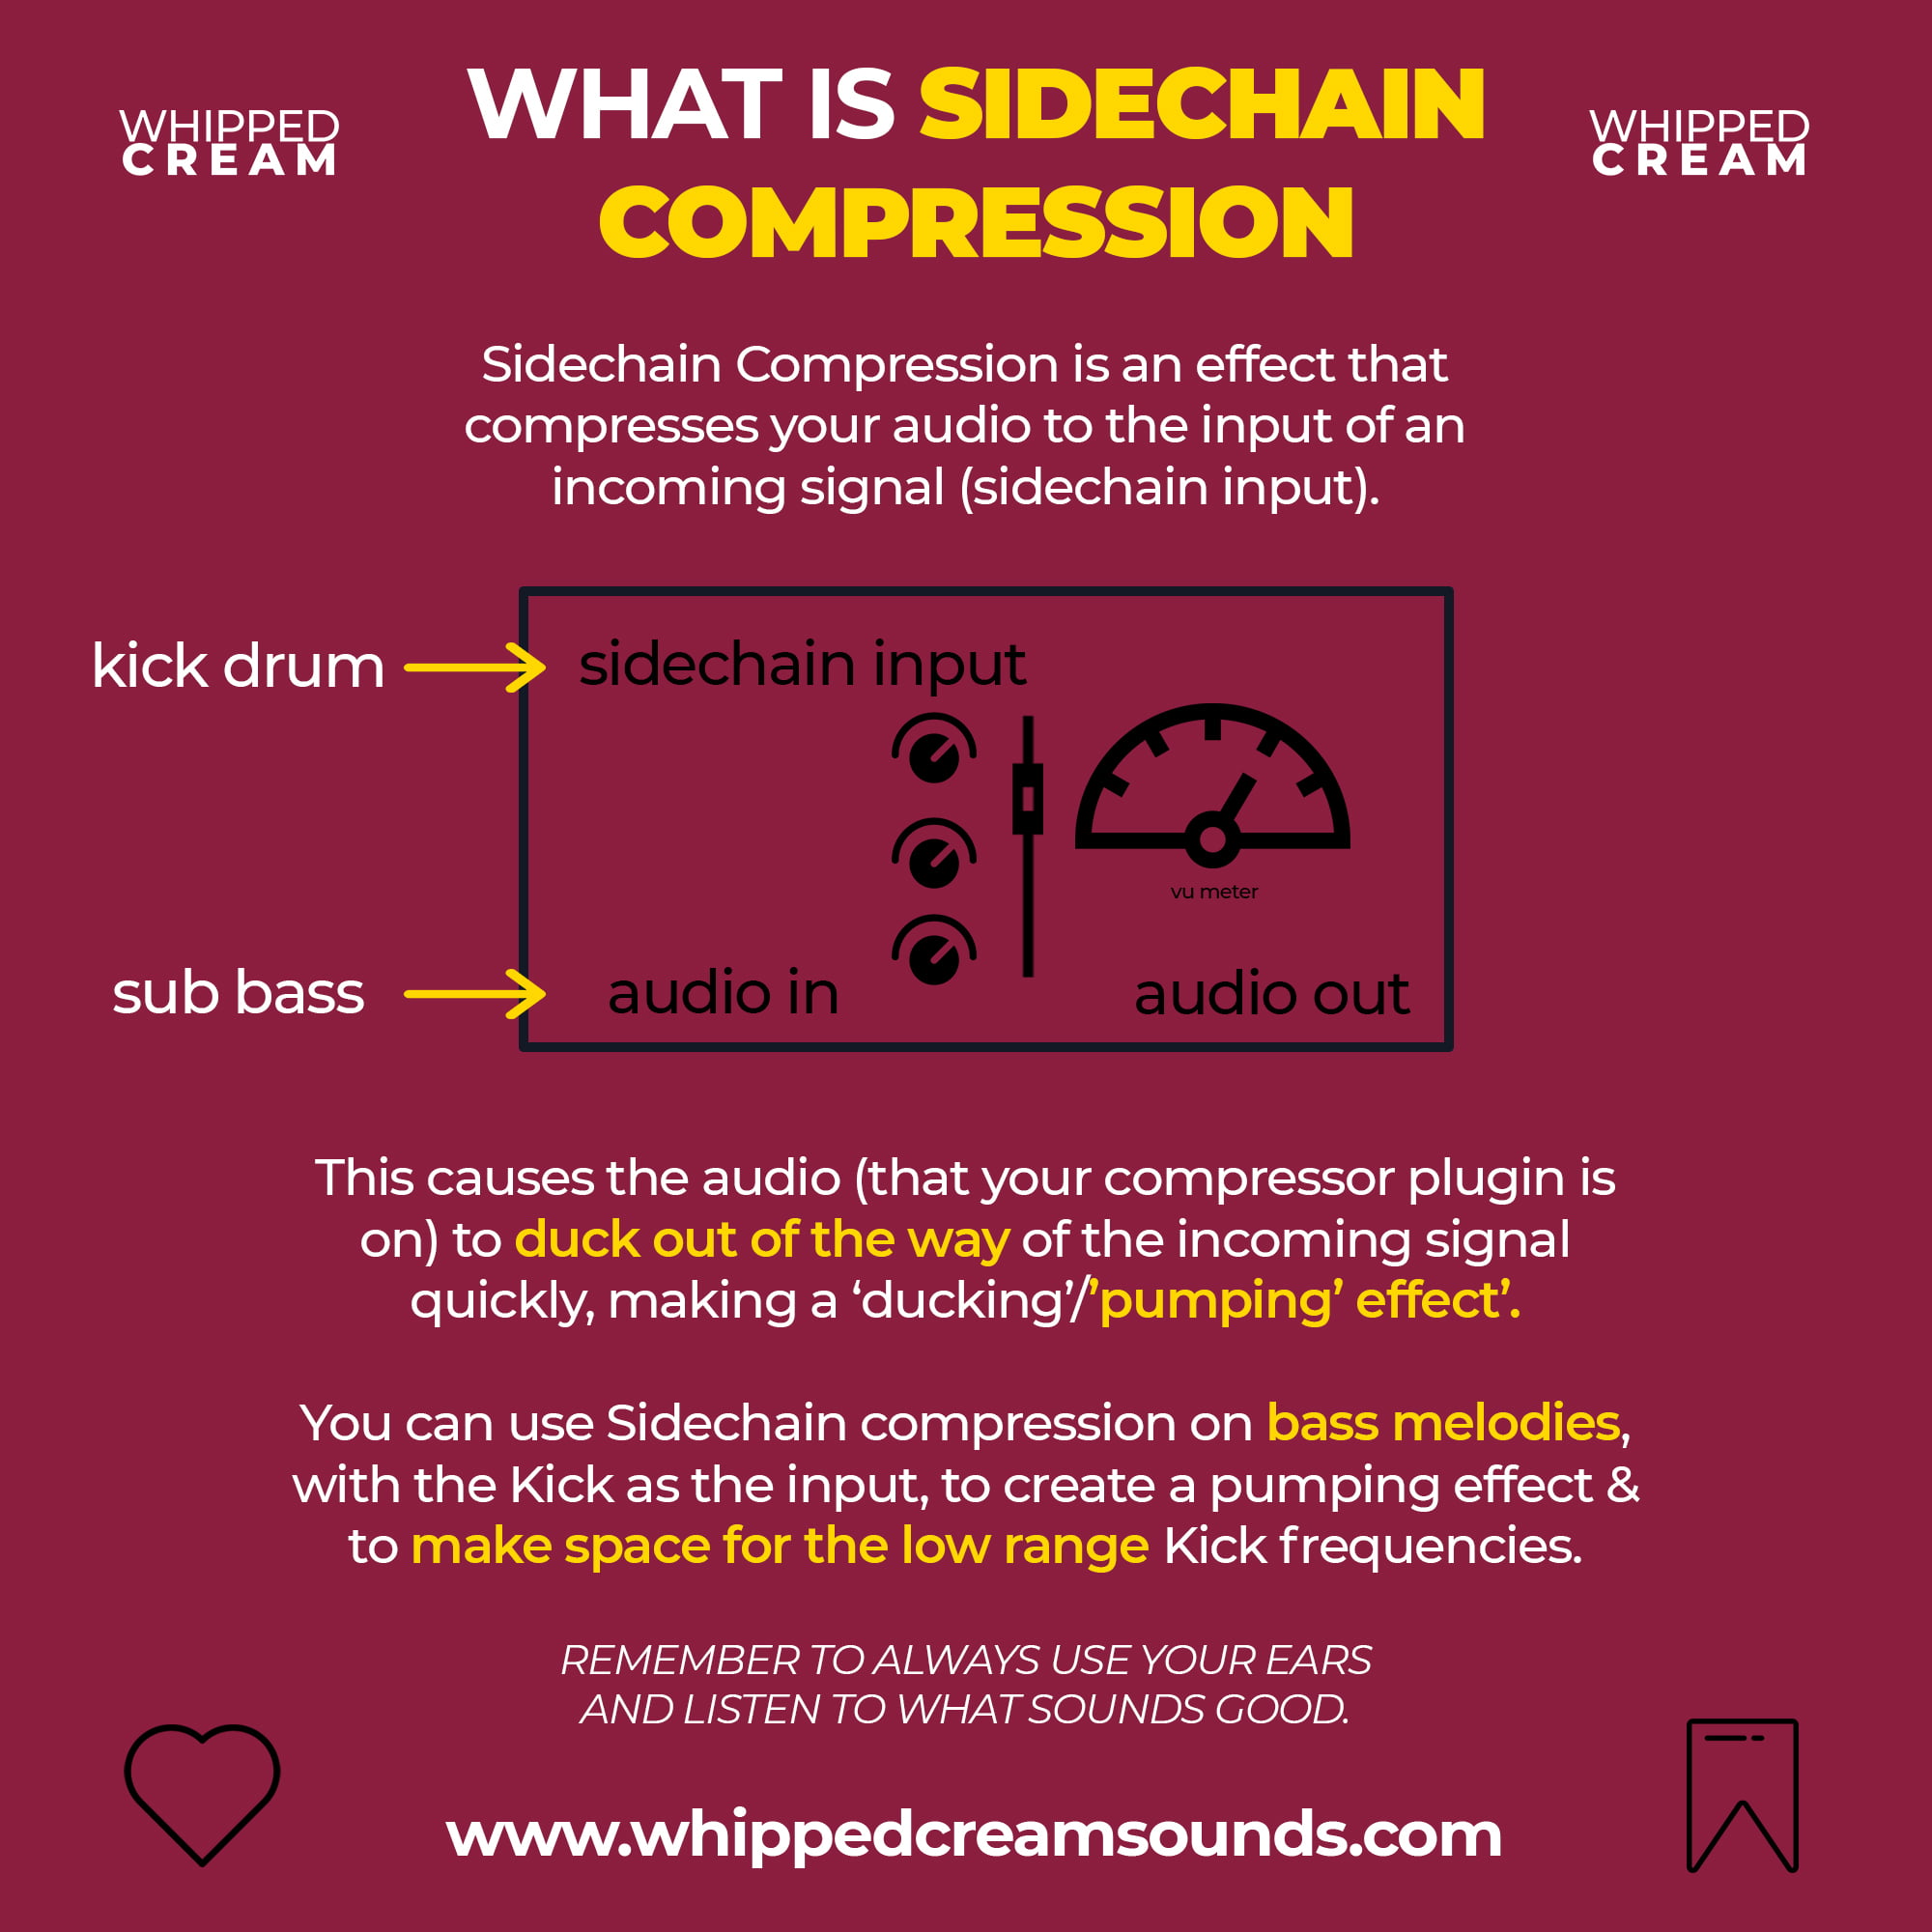
When making any kind of music, sidechaining can be an awesome tool to create more space for elements in your mix. Sidechain on sub bass is commonly used when you have a Kick drum that occupies a similar frequency.
While a lot of people will tell you to EQ the lows out of your Kick, or choose which is more important (the kick or the sub), in a lot of dance music this just isn’t applicable. If you remove below 40Hz on an EQ, you lack all the oomph of the Kick or sub you want to get your listener moving.
But then it’ll sound muddy right? All the mix pros told me I shouldn’t ever have 2 instruments occupying the same low-end information!
Here’s where sidechain comes in handy… You’ll want to pop a compressor on your bass channel and sidechain it to your Kick. This will duck the sub bass out of the way of your Kick, preventing it from clashing & becoming muddy, without losing the low end information.
This technique is especially useful in really boomy dance music.
Parallel Compression
In contrast to the usual functionality of a compressor, which flattens your sound and brings focus to the dynamics, parallel compression is a tool you can use to bring out the tiny details in your audio, and help create depth.
For parallel compression, you will not be putting your compressor directly on your audio channel, rather you’ll normally be putting it on a return track. By doing this, we’re separating the signals, into a dry channel and a compressed one.
By having a clean layer, and a layer that is only the compressed signal, you can then use the gain of these channels, to mix between them and create those signature parallel compression layers.
Note that if the compressor you’re using has a dry/wet control, you can avoid using the return track and just insert the compressor in-line.
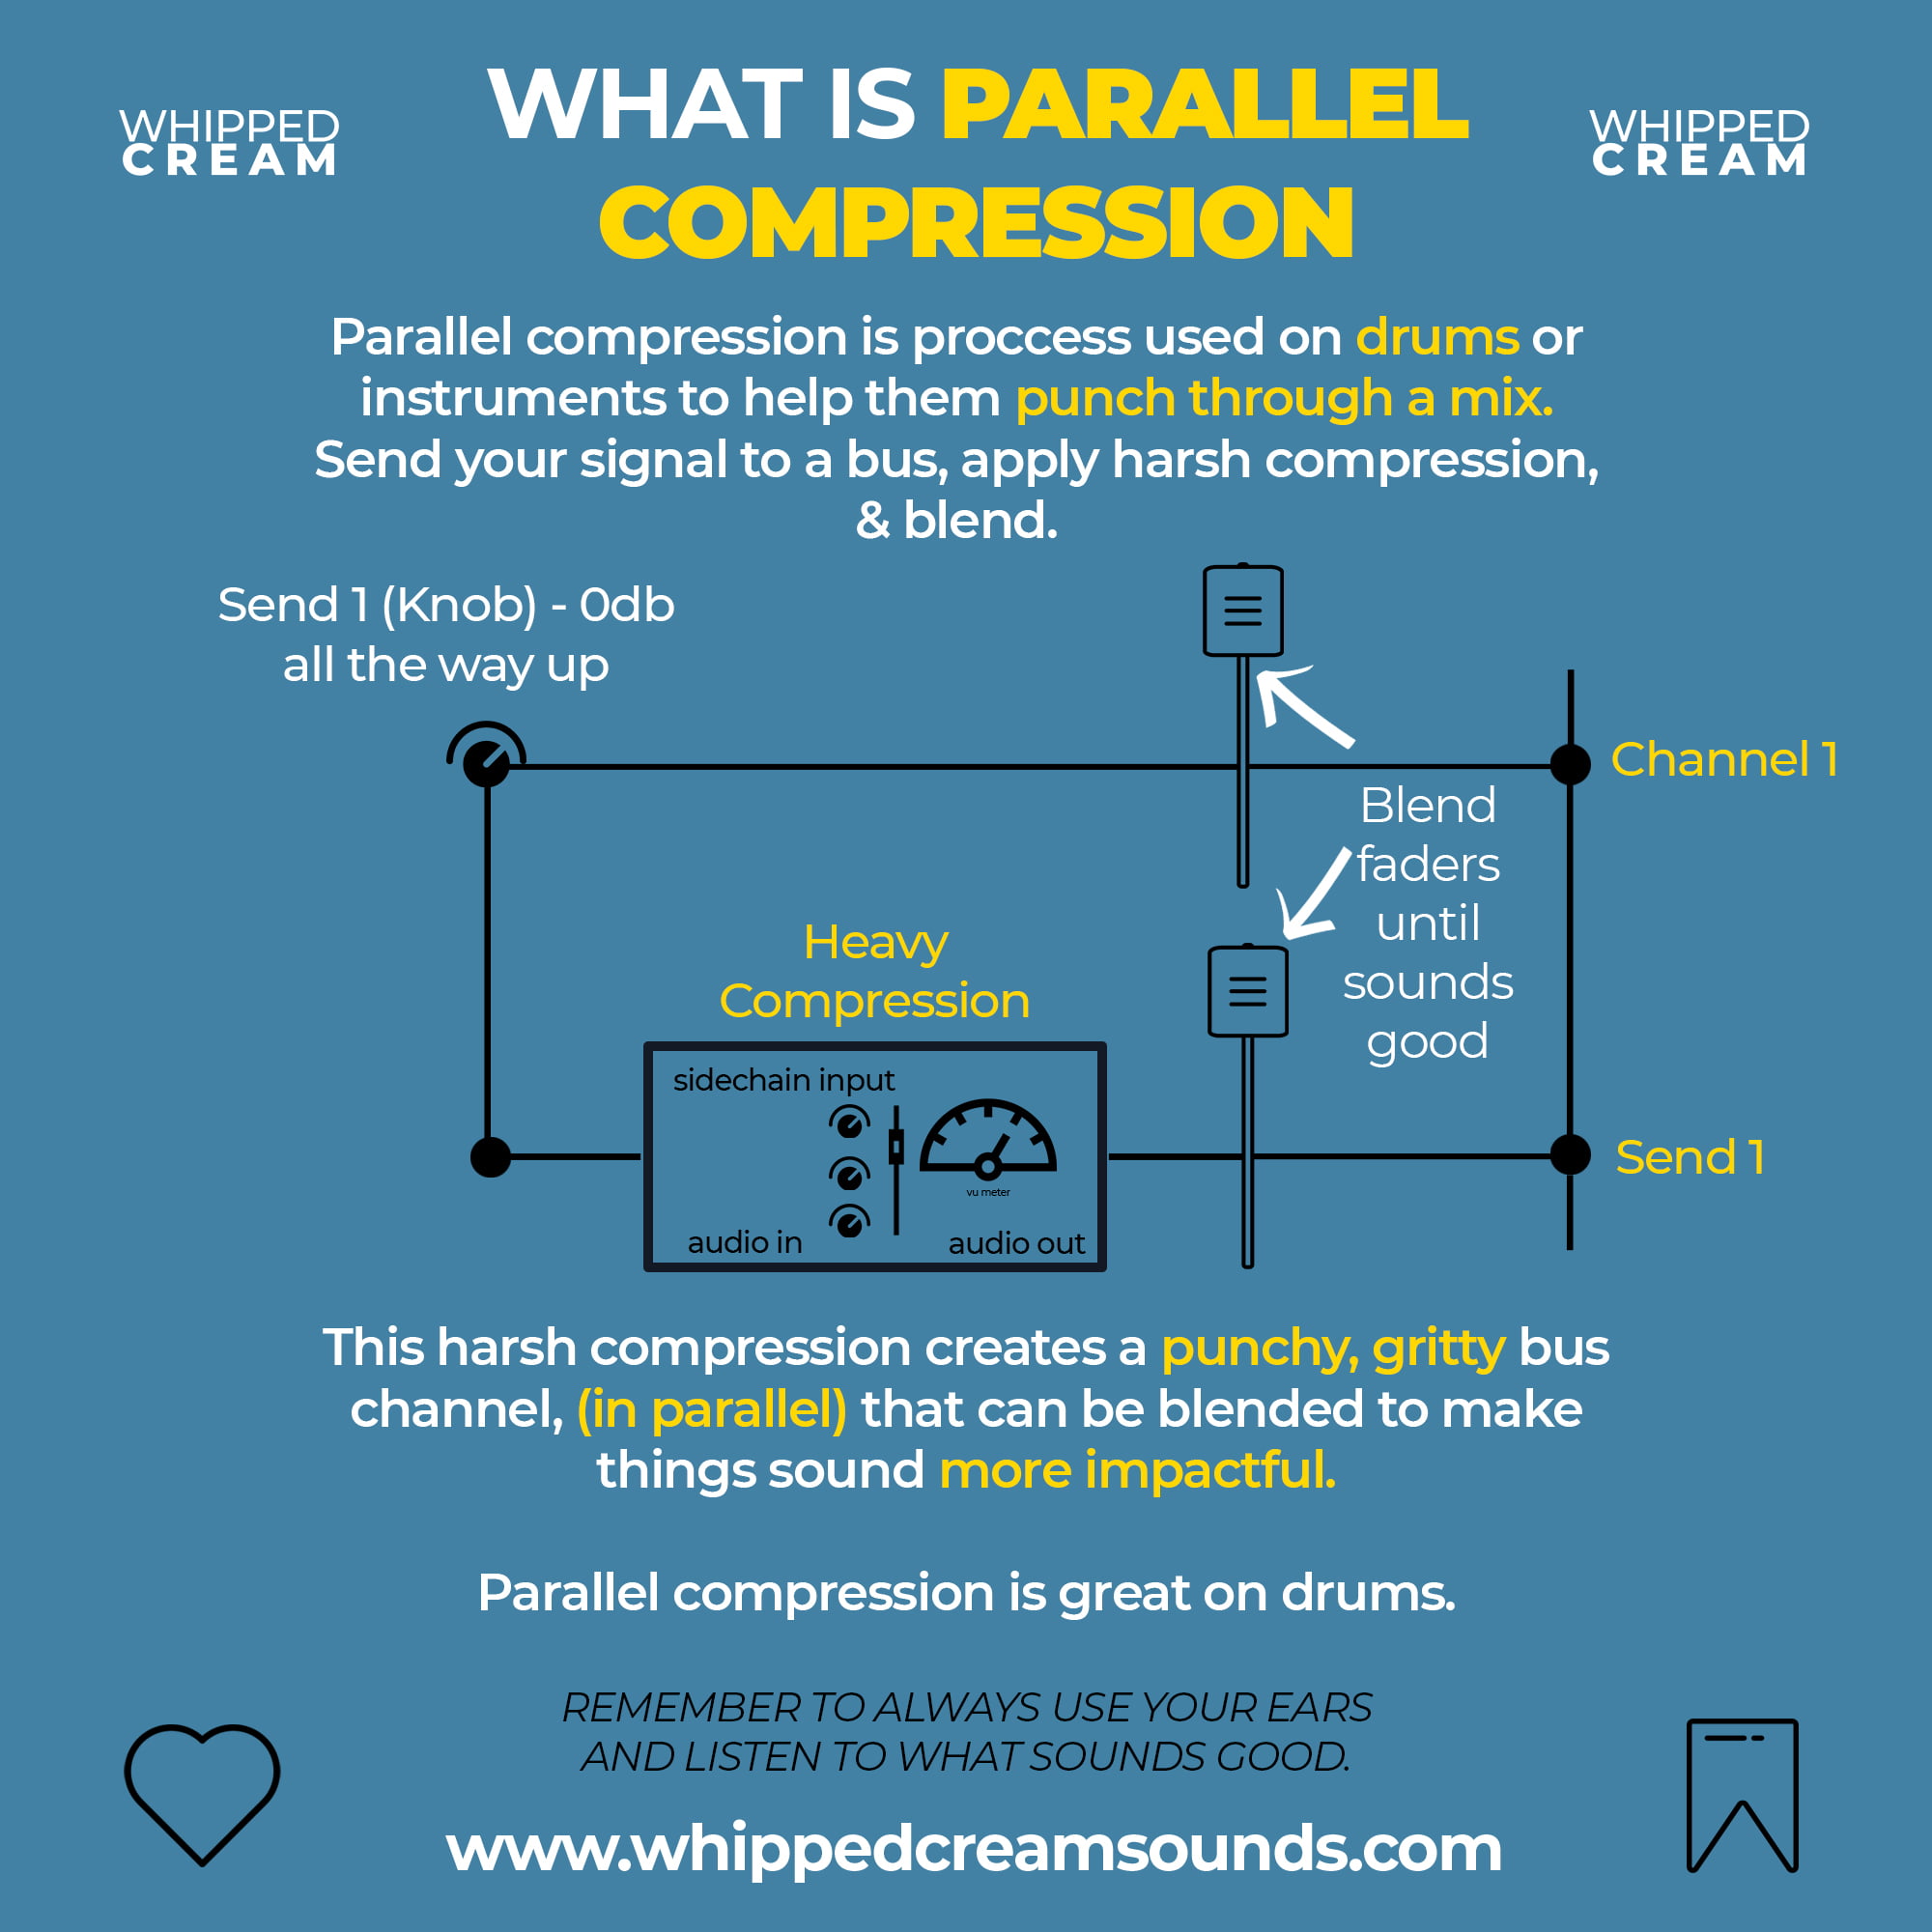
The settings for parallel compression aren’t subtle. To get the heavy compressed sound that you want, we’ll be slamming the compressor as much as possible, forcing it to create the texture you’re looking for.
Solo your send track, and adjust your compression settings to make the sound as rough and compressed as possible.
A fast attack time, high ratio and low threshold are the best things to start off with if you’re slamming your compressor.
After you’ve set it up, drop the channel volume of your return track to 0. Solo both the dry and the compressed channels, and slowly start increasing the volume of your return track.
For this you’ll have to use your ears, to find the exact amount of compressed signal you want to let through.
Remember that you’re using the compressed channel as a layer, and not as a central element, so treat it as such and don’t make it too loud.
Good parallel compression is subtle but extremely effective. It will add interest and energy to your bass sound. It’s also incredibly useful to make things stand out in the mix. Synth bass plucks sound incredible with some heavy parallel compression settings.
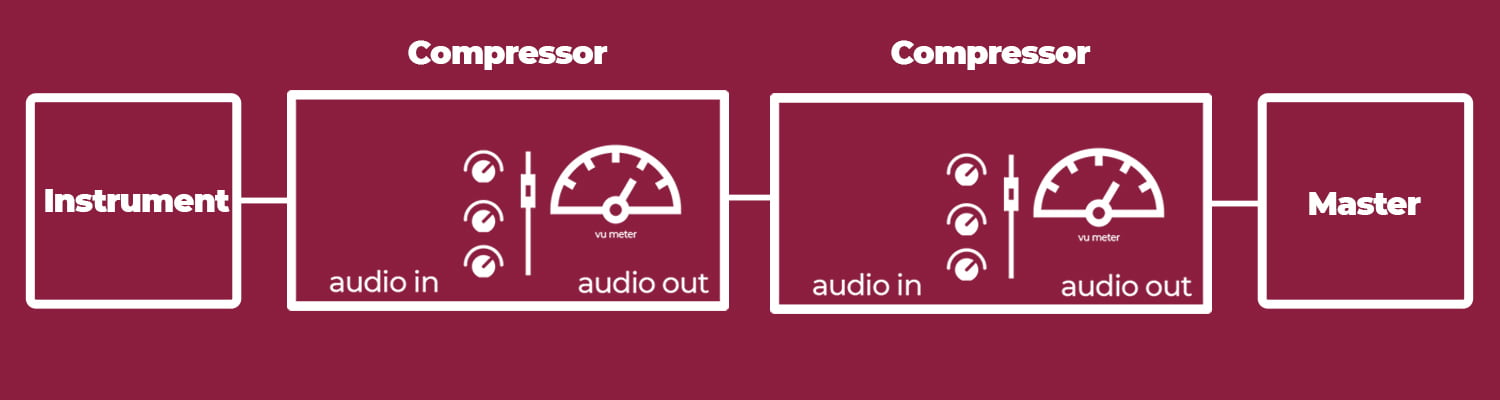
Serial Compression
Let’s say you want to compress your bass to hit 8dB of gain reduction. Unlike our general settings example, where you’d adjust the threshold to hit between 5-10dB, we’ll take a different approach.
For the ratio, attack time and release, keep the previous settings, but adjust your threshold to hit only 4 dB of compression.
For a more aggressive feel, you can up the ratio. Now duplicate your compressor so that you end up with 2 compressors on your bass channel, both hitting 4 dB of gain reduction respectively.
This will function the same as having 8dB of gain reduction on a single compressor.
Why use two compressors instead of one?
When comparing this to a single compressor hitting -8dB, using multiple compressors in series can result in a cleaner sound. The individual compression devices don’t have to work as hard, meaning that you’re introducing fewer artefacts in your sound.
A good serial compression chain can usually be achieved with two or three devices, but you’re welcome to experiment with even more.
We’ve tried using tens of compression plug-ins on a single track in sound design sessions. Doing this can generate some very unique sounding music.
But it needs to be mentioned that using all identical compressors will not get you desirable results. You’ll have to readjust the attack and gain settings for each compressor.
Since compression works with your transients and dynamics, the signal coming out of one compressor, will be different than your dry signal, therefore requiring different attack and release settings.
2. How Should I EQ Sub Bass? – Use EQ Wisely!

When mixing sub bass, it’s important to understand that most of what you’re mixing/listening on, can’t reproduce the lower end frequencies, even though the frequency spectrum might show it.
Headphones & monitors can’t reproduce frequencies below 50Hz accurately, which can lead you to think that you need to low shelf the bass to increase it, & make it more audible. If you do this, you’ll find that when you play it on a system, or in your car the sub bass might be too overbearing.
You need a sub woofer to really hear bass correctly, or at least 8″ speaker cones (headphones are 50mm).
To EQ your sub bass, a low cut on the at around 20-40Hz is a good start. But this depends on where the Kick frequencies lie – if I’ve got a boomy, bassy kick, I’ll low cut the bass up to 40Hz. If I want more sub from the sub bass, I’ll low cut up to 20-30Hz.
For the EQ boost, its’s ideal to boost the low end from the 100Hz – 200Hz point. This is where most of the body of your sub bass will be. Play around with the db settings here, because it will entirely depend on your context. But to give you an example: I can go anywhere between 3-8db boosts when I’m boosting sub bass, using EQ.
With sub bass, you also rarely want high end frequencies – so put a high cut on your EQ settings. I usually take the high frequencies out, anywhere between 500-800Hz.
Like we mentioned in our how to compress bass guide, you can also try out harmonic EQ. If you were to boost your sub at 200Hz, you’d go up in multiples of 2: 400, 600, 800 etc.
Doing this will make your bass sound more resonant, and will build up a number of harmonics. These harmonics will make your bass more audible in the low mids & mids, which is important when trying to get your sub to sound good on iPhone speakers, laptop speakers etc.
Products like these, can’t produce the low frequencies required to make the sub bass audible, so you want to add this low mid, harmonic information, so the sub bass can be audible on all systems.
3. Listen To Your Sub Bass in Mono On Cr*ppy Speakers (And In Your Car)
Yes you’ve probably heard it before… get a utility plugin, and switch between mono and stereo. That’s good, but really you want to be listening through an actual mono device. NOT YOUR HEADPHONES!
Most professional studios actually purchase shitty mono speakers (avantone) to listen through, to make sure that the mix sounds good through that, before it’s finished & sent for mastering.
Most of us don’t have $300+ dollars to spend on a shit speaker though so, Laptop speakers, phone speakers, & stuff like the Amazon Alexa, Google Home, Homepod etc, all have mono speaker setups you can test your music on.
Ideally you want to listen on a setup that a casual listener is going to listen to your music on. If you have a phone, then perfect. Phone speakers are mono (even the new Apple ‘stereo’ setup on X, & above, is 2 mono speakers).
By listening on phone speakers in particular, you’ll notice that your sub bass gets completely lost. You’ll likely hear the same on a set of apple earbuds too, & if you listen on a car stereo you’ll hear the bass just isn’t quite there when comparing to reference mix.
To fix this is actually really easy. All you need to do is fill out the low-mid range of your frequency spectrum a bit more.
You can do this with, saturation, EQ, or doubling the octave – you’ll hear a huge difference, actually be able to hear bass on worse speakers, & your sub bass will sound wicked in on any car system!
3. Distortion & Saturation
That brings me on nicely to distortion and saturation.
Saturation is extremely useful for creating those low-mid harmonics that your bass is missing. Using it will fill up the frequency spectrum and make your bass sound waaaay better in cars, phone speakers, laptops & all the stuff regular people listen to music on.
The idea is to find the fundamental frequency of your bass, double the Hz value you get & add your saturation. To find the fundamental frequency of your bass note, you’ll want to look at your EQ for the biggest bump.
This is your fundamental frequency.

As you can see from the image above, we have our fundamental frequency at 43Hz. So we’ll double it to 86Hz (the 2nd harmonic), and then we’ll add some saturation. You can also double it again and try the 3rd harmonic – 129Hz.
Waves R-Bass is really good for creating this saturation, but you can do it with most stock plugins. Just find a saturator that allows you to choose the frequency range you want to affect.
When you do this ,you’ll hear a massive difference in the low-mid range. It suddenly becomes a lot more audible, which is what we want for car speakers, phone speakers & other casual listening devices.
4. Double Up The Octave
Another way you can make you sub more audible in car speakers, phone speakers etc, is by doubling up the octave.
This has a very similar effect to saturation – it fills out the mid range more, but doubling the octave creates a much cleaner sound. If you’re not going for a heavily distorted & pushed sound, this can be your best option.
I find myself using this method over the saturation method a lot more frequently, but they both have their uses.
To double the octave you just:
- Duplicate your sub bass channel.
- On the new channel, put your MIDI notes up an octave.
- Take out some of the low frequency on the duplicated one.
- Blend the volume levels together.
When doing this, you usually want the higher range sub bass to be much lower in volume. Take it down to -20db and start adjusting from there.
When you next listen in your car, you’ll hear a huge difference in your low end. It will now have a lot more clarity & presence.
5. Choosing The Right Key for Energetic Sub Bass

Ever played your sub on a keyboard and noticed that some notes sound vastly superior to others? Well there’s some science behind that, and it’s all to do with the way most speakers are set up.
Commonly, sub bass sounds the best between notes: Eb1 & B1. This frequency range is 38.9Hz- 61.7Hz.
Sub bass frequencies are in-between the 20-60Hz mark, but not all of it is useful to your music making. And, there’s a “sweet spot” to keep in mind when choosing a key to write in.
Most speakers, headphones (and general stuff you listen to music on), can’t accurately reproduce low frequencies below 40Hz, simply because the sub cones aren’t big enough to vibrate at that rate. Club systems and bigger systems are capable of reproducing below 30Hz, but you’d be hard pressed to find a system, that most people have access to, and goes all the way down to 20Hz, while accurately re-creating it.
Also most club systems have a low cut at 30Hz, so you won’t be able to hear below 30 on the majority of systems.
Below 30Hz is commonly where all the low frequencies we like to call ‘mud’, are found. If you are playing your sub too low on the keyboard, you’ll most likely be playing down in the area where the ‘mud’, low frequencies lie. If you’ve ever been in a cinema and heard that rumble-like bass FX sound, then you’ll know what this mud can sound like.
There’s not a lot of harmonic information down there, and it causes the sound to be overwhelming, thick, and difficult to distinguish. This can cause mixing issues.
If we take a look at the scientific pitch notation on the piano, you’ll notice that C1 = 32.7Hz. This is pushing close to the below 30Hz, and is below 40Hz, meaning that most speakers aren’t going to accurately produce this frequency range, and your sub is gonna sound too muddy as a result.
So when you’re looking to build a sub bass melody, you want to keep this in mind. C1 can still work, but is difficult to get to sound good, and can cause a massive change in energy between notes.
Take a listen to the audio example below. You’ll hear there is a huge difference in clarity and perceived loudness between the G and C note played.
As you can hear the C1 (the 2nd note played), has low frequencies that are audible in it, but they are nowhere near as prominent as the G1 note.
So, when writing your sub bass melodies, it’s advisable to stick to keys that include the notes Eb1-B1. This way you can be sure of a consistent energy in your sub bass throughout.
For more information on frequencies, check out our what is EQ in music guide, for a full instrument EQ chart.
Like with anything in music, it’s also subjective. So if you have a sub bass note that sounds good at C1 (and you’ve checked that it does on multiple systems you can hear it on), then use it!
These are guidelines at the end of the day, and when mixing sub bass it’s important to use those ears god blessed you with.


