
When it comes to mixing, one of the hardest things to master is vocal mixing. Vocals can be tough to fit into populated mixes, and you’ll need to work for a great vocal tone.
That being said, vocal mixing can be very fun and creative, so don’t be scared of tackling vocals from the ground up! In this article, we’ll share with you, how exactly to mix your vocals like a professional!
Contents
1. Get a good recording
The biggest takeaway you’ll need to remember from this article is, that no amount of mixing can fix a bad recording, and no amount can beat getting a great recording.
If you’re starting with an awesome vocal recording, you won’t have to do much at all. In fact, a lot of the “best” vocal performances ever are barely processed. That being said, a perfect vocal recording needs to tick a lot of boxes, and it’s quite rare to get a perfect vocal recording.
As a mixing engineer, you’ll need to know how to deal with bad recordings, as well as awesome ones, so you can be flexible and get the most out of any work you get sent by artists.
However (if you can), spend an extra hour when recording, to get it right – it can save you hours when mixing.
2. Apply gain automation to even out your vocals
No matter how good they are, no vocalist can perfectly adjust their tone, volume and energy, to get you a consistent levelled recording.

So, to start off mixing vocals, you’ll need to flatten the take and make it as even in volume, as possible.
This means making sure that the vocal is hitting the same amplitudes over the entire recording so that no single part is louder than another. You can usually do this by automating the gain of your audio clip. It’s best to select a middle point between your loud and not so loud frequencies.
Turn down the louder ones, while bringing up the quiet parts, so you get to that middle point where they sound consistent in volume. This way you’re doing as minimal of an adjustment as you can, but still getting a more uniform signal.
QUICK TIP: You can bounce your gain automated vocal as audio and compare the waveform with the original to see how uniform you have the levels.
Gain automation is important for applying dynamics processing a little bit later, but we’ll also add another automation stage, which will help fit the vocals to the rest of the track better. In the beginning, just listen to your vocals solo, and try to get them to sound more uniform.
What Do I Do With Multiple Vocals?
Let’s say you’re working with a rapper or somebody who likes to sing harmonies or overdubs. You’re bound to end up with a lot of vocal tracks that you then have to re-assemble into a cohesive sound.
This can be quite tough, but it’s doable. The key to fitting different takes together is, panning and EQ. If all your vocal tracks sound the same, you’ll need to introduce some differences to allow them to stand out, prevent clashing of frequencies and also sound cohesive.
A good trick to make the main vocal take the centre of attention is to use a saturation plugin to add more saturation than the rest of your vocal takes. This helps give it a rougher and edgier sound, that cuts through the mix better. Things like tube saturation sound great on vocals and we’d recommend experimenting with that.
Another awesome trick we like using is playing around with the vocal dynamics. For example, instead of using an energetic main vocal in the front, you make a subtle, calm vocal the focus point, while mixing in the energy with the main in the background.
This can create interesting contrast for your vocals, and we tend to try it out whenever we want to make the mix more exciting.
3. Use surgical EQ to remove resonances
Once you have your track gain evened out, you’ll need to start paying attention to individual frequencies.
Bad frequencies are something that can easily ruin a vocal mix, so taming them can be key to getting a great mix. While this is not a 100% all the time, always, kind of thing, you’ll need to do it more times than not, so you’ll gain a lot if you learn how to deal with resonance.
There are tools around, such as Soothe 2, that are designed for this exact purpose, but it’s very useful, to know how to do it manually!
The hardest part about doing this manually is listening. You need to be able to hear the issues in your audio, as well as locate them, to be able to do anything. This comes with time, so don’t worry if you don’t get it at first!
If you’re new to production, a good idea is to do some ear training to learn how to locate frequencies more instantly.
To locate problem frequencies, you’ll have to play your vocals, and start listening out for any parts in the frequency spectrum that sound too powerful, or overly resonant.
Then, using a graphical EQ (we’re using Pro-Q 3), you’ll go through the frequency spectrum, and solo individual frequencies, until you find the offending resonance.
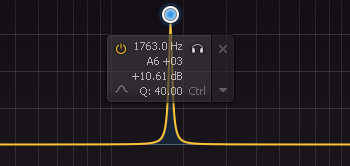
This is easiest to do if you make a tight bell curve with +10dB of gain and soloing it. You can then sweep through the entire frequency spectrum while listening out for the resonating frequency. This will sound horribly annoying and difficult to listen to and you’ll know when you’ve found it.
Once you’ve located your frequency, drop your bell curve to anywhere from -1 to -4 dB. This will help to reduce the resonance from your vocal take. Make sure not to cut too much though, or your vocal can start sounding very dull and uninspiring.

Do this for all the problematic frequencies you can hear. You can also use dynamic EQ for overly problematic resonances that ruin the recording when removed. Dynamic EQ allows you to remove the resonance, but still keep it in the vocal.
5. Apply musical EQ to the vocals
After you have levelled and EQ’d your vocals, you can now start shaping your vocal, starting with, musical EQ.
So, open up another EQ on your vocal, and use this to shape the tonal quality. What you do at this stage entirely depends on the type of vocalist, recording, etc. so don’t take what we do as set in stone – this is simply a guide to show you how we think and go about it.
Rolling off Bass
There are some general steps you can take, that will get you to a good point for your vocal, starting off with a bass roll-off.
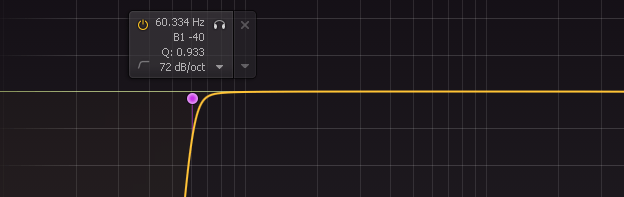
Remove up to 60-80Hz from the low-end with a high-pass filter. This will make sure you’re not letting any unwanted low-end go through.
Proximity Effect & Muddiness Treatment
Next, due to proximity effect, whenever your vocalist is really close to the microphone, you can start getting some muddy and boomy plosives around 200Hz-500Hz.
To help with this, we usually like to use a wide bell filter, to take out around 1 to 1.5dB from the signal here.

Adding Presence & Air
Presence and Air are very important for a vocal, and ensure what you’re hearing sounds clear. Presence is in the range of 3-5kHz for vocals, which is the most sensitive frequency range for the human ears.
Push this up if your vocals are feeling a bit lost in the mix

Air is the high frequencies in your vocal, this brings sparkle and character to a vocal, so if you want a more “crystalline” sound, do a subtle adjustment here. Make sure you don’t overdo it, or your vocal will start sounding very harsh.

Lastly, we like to roll off our vocals at around 17 -18kHz, depending on the source. We don’t want to let through any frequencies beyond this point, because there are no more vocals there, just noise and unwanted sonic artefacts.

At this point, you’re pretty much done with EQ. Make sure you listen to your vocal and A-B it, to hear exactly what you’re doing, and check whether it’s an improvement on the original or not.
6. Apply De-essing to remove sibilance
Whenever you’re working with vocals, you’re bound to run into plosives and sibilance. These are sounds that naturally appear in language, plosives are the p’s, b’s, and sibilance are the harsh, s and c’s.
While we take care of plosives with EQ, sibilance has to be treated separately, with a de-esser.
De-essers are super simple dynamics controllers that tame the ‘s’ sounds in your vocal, making them sound less harsh and more rounded.
De-essers are an important part in vocal mixing, and go on nearly every vocal we touch. De-essers usually have just a couple of controls, and most DAW’s come with one by default, so there’s no reason not to utilize them.
You will have to play around with the settings on a De-esser to get the full benefit of it. It works best when you’re able to solo the audio your removing. Then you’ll be able to sweep through and apply the processing area to the correct bandwidth area that’s causing you problems.
Usually, the problematic frequencies are found between 4-8kHz. Make sure when applying De-essing, you don’t go too hard on the threshold, or your vocalist might start to sound like they have a lisp!
7. Add compression to your vocal
For vocals in modern music, consistency in volume is extremely important. While you might think that a lot of perfection could lead to an unnatural vocal, in the mix, it really doesn’t
When we’re trying to have as much control over the vocals dynamics as possible, we need to use a few different tools and techniques to accomplish it. (This is the reason we automated the gain on our vocal, before we did anything else)
After this, to get more precise dynamic control, we use compression. Compression not only gives you that dynamic control but also lets you enhance and shape the tone of your vocal.
The amount of control you’ll need on your dynamics is entirely genre dependent. While you may need to have a more processed and controlled vocal for electronic music, pop and hip hop, for styles like Rock and Jazz, you need to approach compression with a more leveled head.
Intimate genres such as Jazz will instantly sound weird, when there’s noticeable processing going on, which will take away from the experience. Rock on the other hand, needs a more energetic and compressed vocal, with tons of body and less top-end.
So, let’s start off by setting up our compressor, we’ll start with the FabFilter Pro-C2 for our baseline compressor, and we’ll move onto more colorful compressors down the line.

Depending on the audio, we’ll put the compressor either in front, or after the Tonal EQ, but make sure you have your de-esser behind any compression you have in your chain.
To be able to fully utilize your compressor, you’ll need to have a goal in mind. What are you trying to do with this compressor?
In this case, we’ll be approaching the first compression stage with a light touch, subtly shaping the vocal tone, and adding a little dynamic control, to smooth out the vocal peaks. We’re not trying to squeeze the transients here, so we’ll use a slow attack and release. In our case, we’re hitting 25ms on our Attack Time, and 40ms on the Release Time.

Next, set your threshold so that the compressor is engaged on every word in your vocal. This will give you a very cohesive compression characteristic over the entire vocal.
Lastly, set a very low ratio, so that you’re not hitting more than 3dB of Gain Reduction.
This makes sure that we’re only lightly affecting the vocal, and giving it more tone, and control, ready for some more colorful compression!
8. Use serial compression

More subtle genres will be fine with only a bit of dynamic control on your vocal, but for genres that require heavier processing, we’ll be using multiple compressors in series.
While you could turn up one compressor to a 10:1 Ratio, doing the same with 5 compressors at 2:1 Ratio, will result in a much more natural-sounding compression.
This is why we’re going to compliment our initial compression stage, with a couple more colorful compressors. Colorful compressors usually have a certain tone that they give to the signal, which can add a lot of character to your vocals.
Our favorite (and probably everyone elses) combination of vocal compressors is the 1176 into an LA-2A.

This is probably one of the most utilized vocal compression chains in modern music, and for good reason – it sounds awesome.
In our case, we’re using the Waves CLA compressors pack, which has emulations of both of these compressors, but you can find other versions out there.
For our 1176, we’ll use the CLA-76 Mono, and CLA-2A Mono for the LA-2A emulation.
1176
the CLA-76 is a FET compressor, which means it can be very fast and aggressive. The 1176 is another FET compressor and is loved by engineers because it can pretty much improve any sound you throw at it.
For our vocal, we’ll start off by selecting a 4:1 Ratio (you can go higher for more character and energy). The CLA-76 also has a feature which is the “ALL” Ratio, which comes from audio engineers literally trying to press all ratio buttons at the same time.
The “All” Ratio has a very aggressive and energetic feel and can be awesome to get a very controlled and characterful vocal.

After you’ve set the ratio to 4:1, you’ll want to set a slow attack and fast release. This is entirely dependent on the vocal, so you’ll have to know how to dial in compressor release times.
The input knob of the CLA-76 is also the threshold, so push this up until you start to see about 3-5dB of gain reduction.
Then, adjust the output knob, to compensate for any added or lost gain.
LA-2A
We’ll use the LA-2A to smooth out the vocal after the 1176, which will result in a much more controlled and cohesive vocal.
The LA-2A is famous for having a warm fat and smooth compression characteristic. Both the original hardware unit and the CLA-2A versions can be pushed up quite a lot, while remaining musical, and adding nice distortion to the signal.
For our purposes, we’ll be using the CLA-2A for our last main compression stage, so we’ll use it to subtly push up the vocals to nearly exactly where we want them to be.

The LA-2A is a very simple unit to use, only having two main controls, a Gain and Peak Reduction knob. It can also work as both a limiter and a compressor. For our purposes, we’re using it in compression mode.
Push the “Peak Reduction” up until you’re hitting around 2-3dB of gain reduction, and then adjust your gain, to make up for any added or lost gain.
9. Add parallel compression to your vocal
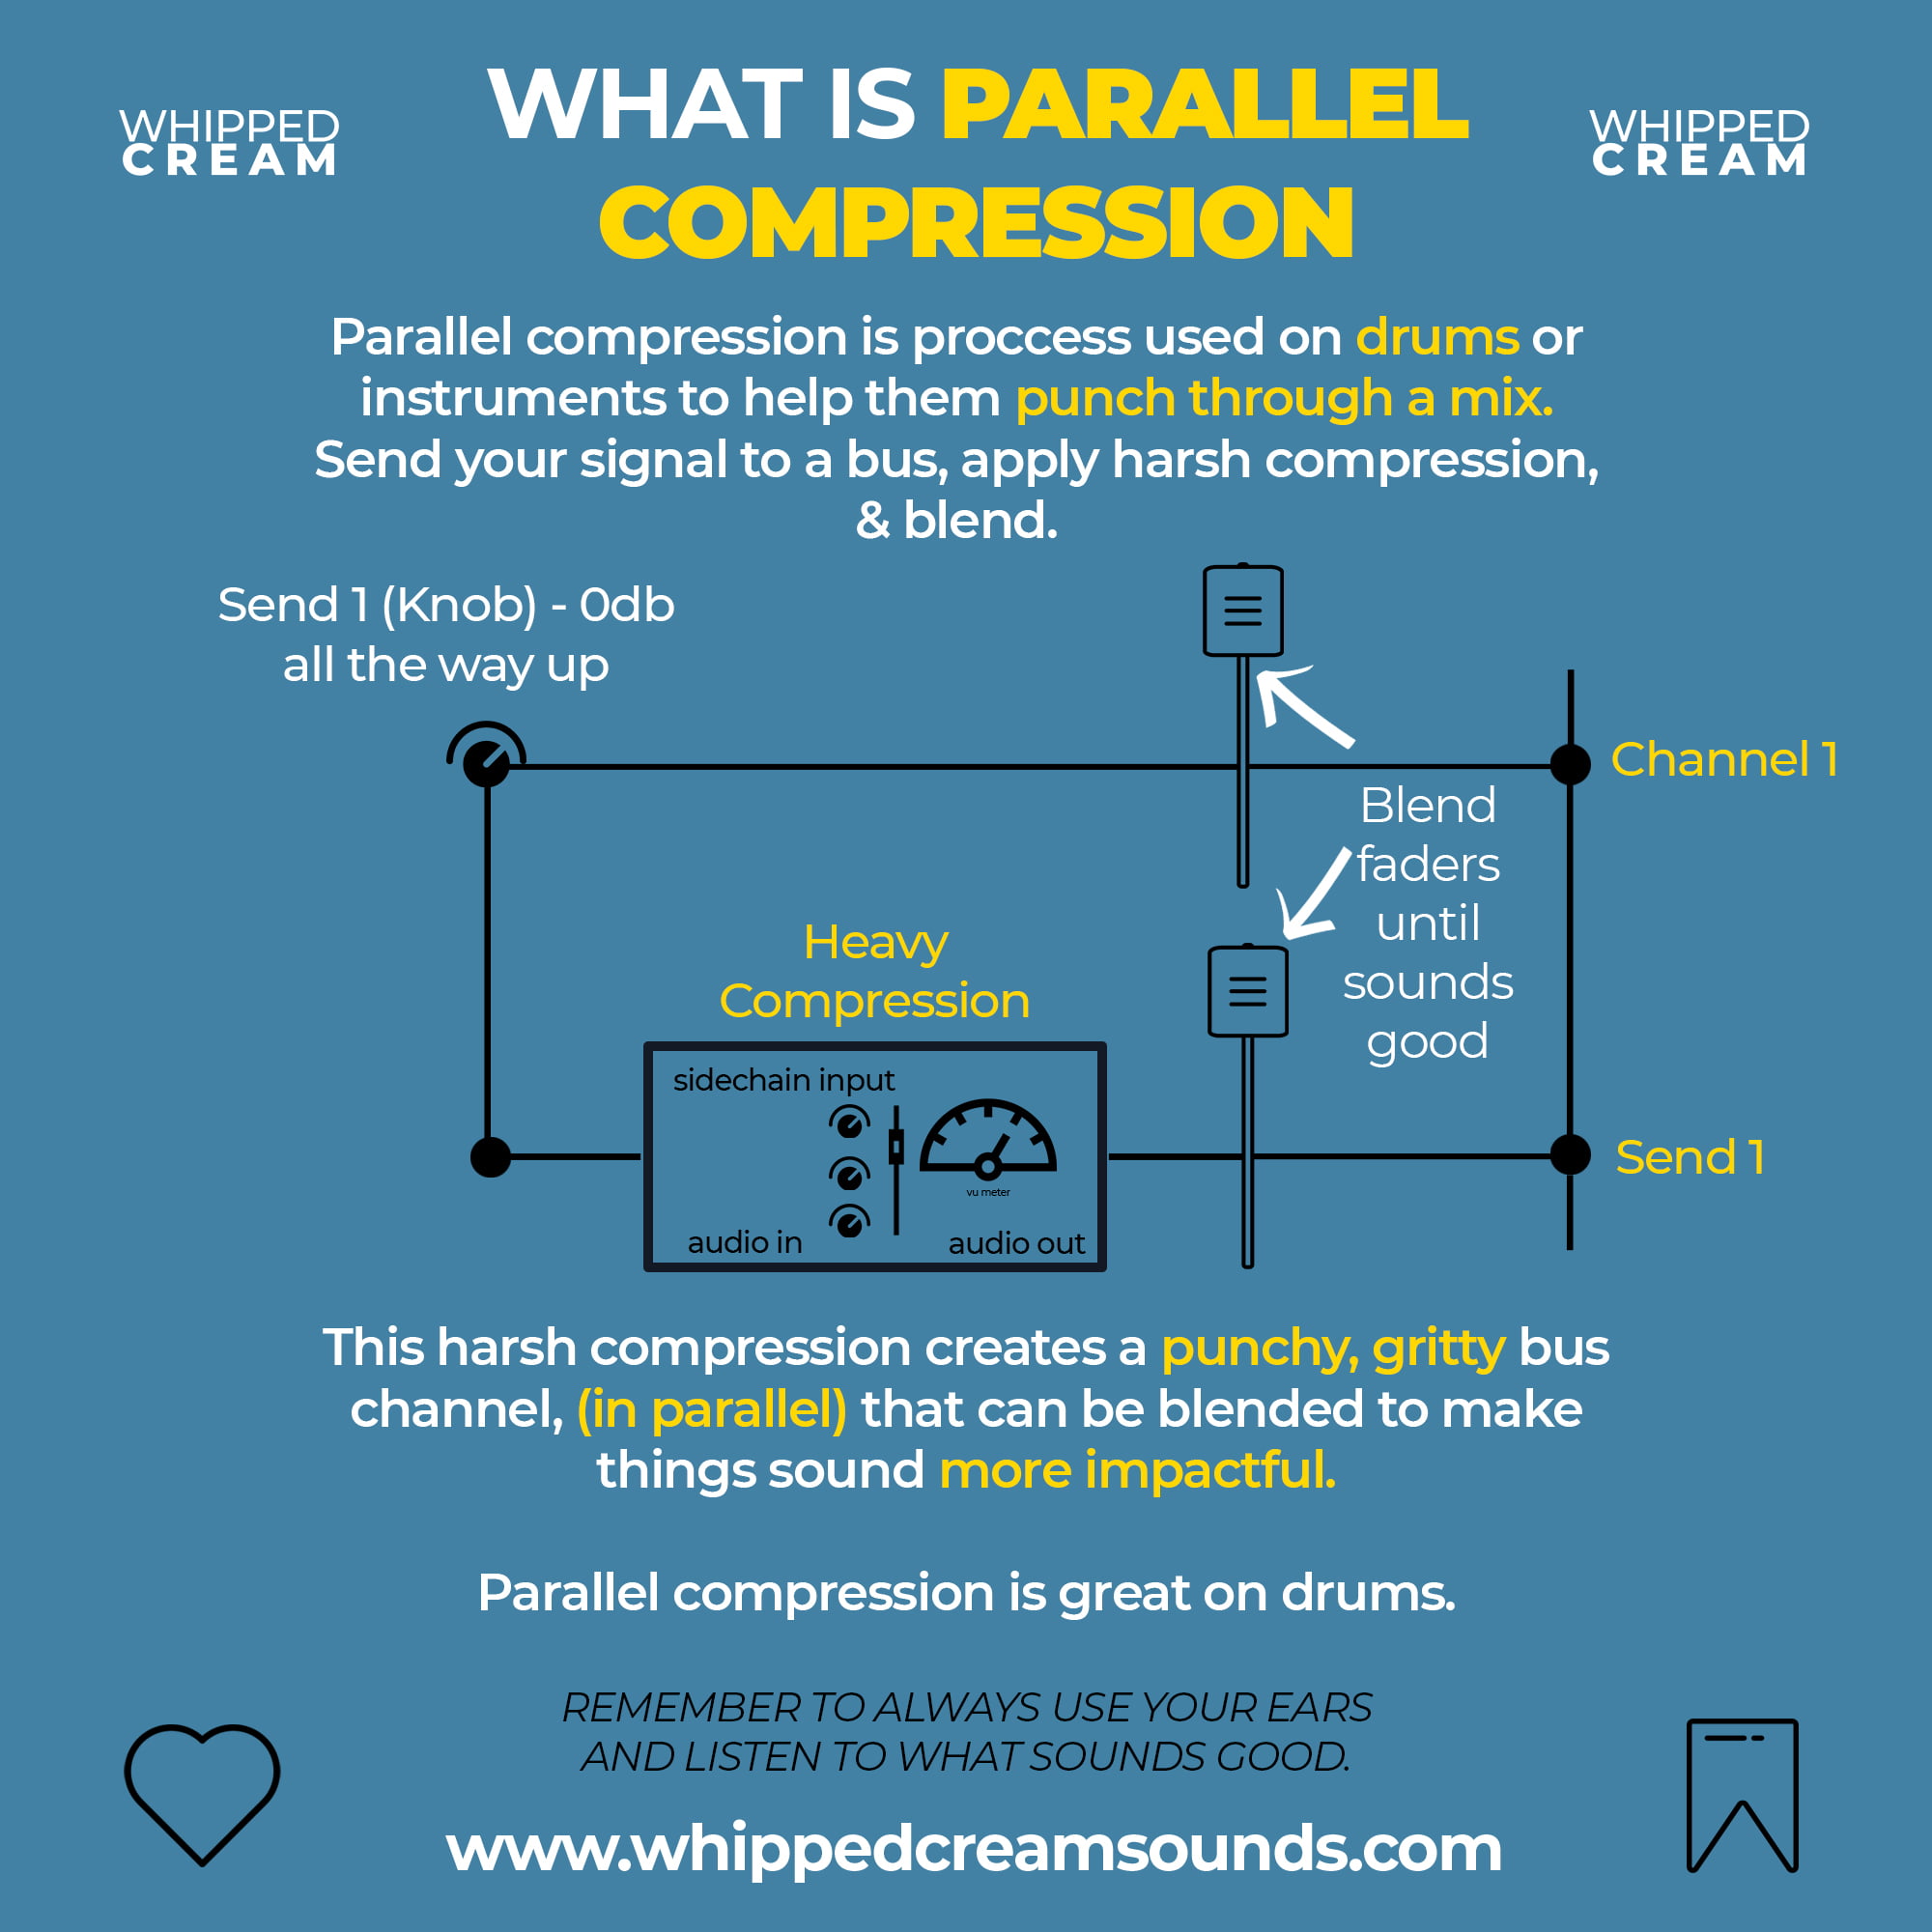
Parallel compression is very different from what we’ve talked about up to this point. Instead of trying to be subtle and controlled, parallel compression is where you can have tons of fun and really smash the signal. You don’t always need to have parallel compression, it can be a situational technique, but it does improve pretty much everything it touches.
Let’s say you have a very clean and nice vocal – you want to retain the clean and uncompressed tone of the vocal, but without plenty of compression, it gets lost in the mix and just sounds bad in context.
This is when parallel compression can be your godsend. Instead of compressing our vocal, we’re going to be adding compressed signal on top. To put it more simply, we’re just going to add the character and tone of the compression on top of your vocal, so you can have the best of both worlds.
To setup parallel compression:
- Create a new send track
- Open a compressor plugin on that track
- Send 100% of your vocal take to that send
(You can also do this by using Ableton’s audio effect rack and setting up two chains)
On the compressor, you want to set a very low threshold, high ratio and fast attack and release – you essentially want to smash the compressor as hard as you can. This creates a punchy, boxy sound that is then blended into the original signal.
Then, you route your vocal to the send (as explained above), and use the faders to mix in the parallel compression with the original vocal take.
Make sure to use a colorful compressor for parallel compression! This will give it a lot more tone and character, which is exactly why you want to use it.
10. Apply saturation to your vocal
If by this point your vocal still doesn’t have enough edge and body, you can turn to saturation. A subtle amount of saturation can give tons of energy to a vocal, and make it cut through the mix like butter. Saturation should be used quite sparingly after you’ve already done tons of compression to your vocal.
In our case, we’re missing a little bit of warmth and body in our vocal, so we’ll try to add it back with some saturation.
We’ll be using the SoundToys Decapitator since it’s our favorite saturation plugin, but if you’re doing the same, be careful not to overdo it. Decapitator lives up to its name, so we’ll be using it very subtly.

We’ve set Decapitator on the E mode, which is modelled after Chandler EMI consoles, and have tons of warmth in the lows, with silky clean highs.
We’ll, then adjust the Drive, so that we’re only driving the vocal a tiny bit, just adding the character of the plugin, rather than any distortion. And, if you want to get more tone out of the plugin, push the drive up higher, and drop the mix level lower, this results in an almost parallel saturation type of effect.
The key with saturation is subtle, and we don’t want to ruin our vocal towards the end of the mix!
11. Apply limiting to bring your vocal levels up

A limiter will be the last thing you add to your dynamics chain. While it’s not always necessary, a limiter gives us a very clean way to control the peaks of the signal, as well as make it louder. We usually leave a limiter after our compression and saturation, in case we need to get more loudness or catch some peaks that have somehow passed through the compression.
If you’re trying to get your vocal to be as flat and compressed as possible, you can also use a limiter to clip off all the peaks and level out the vocal completely. This will start to sound unnatural but can be very fitting for more processed genres of music.
Play around with your limiter settings and make sure not to overdo it. Limiting can distort and compress audio horribly if done wrong.
12. Use spectral slotting to create cohesion
After you’ve followed the above steps your vocal mix is pretty much ready. What can happen at this point, however, is that the vocal can be so present and full, that instead of mixing with the rest of the track, your vocal sits on top of everything else.
A detached vocal is usually because you have mixed your vocals, without hearing how they sound in context with the mix. This is where you can use spectral slotting, which is essentially just a fancy way of saying – create space for your vocals and other instruments to sit in, so they don’t clash.
Vocals shouldn’t sit detached from the mix and should feel like they’re in the middle of it.
In most cases we usually remove the low-end from the entire vocal chain, to leave space for any other low frequencies that might clash with the vocal, preventing muddiness.
Then, we’ll make sure the volume levels are set right, so that the vocal is audible, but sounds embedded in the mix.

Next, a trick we like to use is subtly sidechaining the high percussion elements, like hi-hats and snares, to our vocal, so that the vocal ducks slightly, every time there are high percussion elements present. This usually makes the vocal feel more settled in the mix almost instantly.
Another useful technique is to use a dynamic resonance suppression tool like TrackSpacer, Soothe 2 or Smooth Operator to sidechain instruments out of the way of each other.
Used in sidechain mode, these will take care of clashing frequencies by ducking them out of the way of each other on a multiband-like basis.
You can also use EQ on all your instruments to carve out space for your vocals and make them sit better, but this can be a laborious process.
13. Add reverb and delay

Once you are done mixing your vocal, you can start to add reverbs and delays. This will be an entirely creative endeavor, however, there are a few rules of thumb you’ll need to remember.
Most importantly, don’t put reverb plugins and delay plugins directly on your vocal channel. You’ve just spent a lot of time making your vocal fit the mix, so adding reverb or delay into the chain, will just wash out all the good work you’ve done.
Make sure to put your reverbs and delays on a send track. This will add the reverb and delay on top of the vocal, instead of washing it out! A lot of the time plate reverbs are perfect for vocals, so we’d recommend playing around with some plate presets first.
The time of decay really depends on the style you’re going for and on the context of the vocal. Play around with the settings until you get something that fits with the rest of your track. We usually like around 2-3s decay on vocals, but it’s not a one size fits all scenario.
For delay you can add some vocal doubling techniques to add extra width and depth to your vocal. By using a 1/16 – 1/32 note echo or delay on a parallel chain (like with compression), you can mix the echo in at a low volume and give a certain punch to your vocals.
Underlying, creative delay can also be used on a longer delay time frame to give ambience to the sound. Like with reverb, this depends on the context and what sounds good with the track.
TIP: When you put reverbs or delays on a send track, make sure you have the mix control all the way to wet, so you’re not doubling your original signal at all!
14. Add some more volume automation
The last thing we’ll do will be another stage of volume automation. This should be done only after the entire mix is finished! Before going on to mastering, go through the vocal again and automate the volume of the channel, to even out the vocal, in context with the mix.
For instance in chorus sections, the instrumentation will get louder and you’ll have to automate the volume of your vocal up so it can still remain present in the mix.
It’s the last quality assurance to make sure your vocal is sitting at the exact level you want it to be, throughout the entire track.
Finishing Up
Vocal mixing is quite a difficult thing to master. Whether you’re a beginner or a seasoned professional, you never stop learning, and you’ll always keep finding new tricks and techniques to apply to your vocal chains.
Additionally, you might decide that none of this works for you, and come up with your own way to mix vocals. The important part is that we continue to make music, and make it sound better and better, with every attempt!
If you enjoyed this tutorial, make sure to check out some of our other awesome lists, reviews and tutorials!
Toms is a music producer & DJ, born and raised in Post Soviet Latvia. Currently based in Brighton, Toms has had over 6 years of experience with all things production and in that time, he’s done a tonne of cool stuff! He’s played multiple festivals, had experience in the field with mixing & mastering and even become a freelance journalist in the music industry.
Toms currently creates music under the alias Sovereign. Producing music that’s intimate and subtle, while full of edge and energy, the young producer combines the artistic sounds of Trip Hop artists like Massive Attack, with the energy and youthfulness of producers like Flume, Jamie XX and Yaeji. You can check his stuff on Soundcloud.


